How To Make Sure Your Boosted Facebook Posts Actually Reach Your Dream Customers

Recently, I came across a post in a Facebook group for Boss Moms (because yes, I am a Boss Mom too).

She was asking about boosting Facebook posts on her business page, which is something I’ve been doing recently, so it caught my attention.

She said:

“So I decided to Boost a post on my FB page to try it out. I paid $2, got 60 likes. As I was going through them to invite to my page, I noticed most of them were very similar names and 4 the same last name. All looked to be foreign names (nothing wrong with that but I can’t imagine so many Russian last names when I am targeting the Deep South). Does this sound odd to any of you?”

Many people told her that boosting posts is a waste of time and money, and she should just do ads.

I agree that Facebook ads are good, and often are the right solution.

But, boosting posts can also be an effective strategy, if you do it right, and make sure that you’re targeting the right audience.

If you just click that blue “Boost Post” button and tell Facebook to GO, you’re missing a big important step of reaching your target audience with that Facebook boost, and you’re probably not reaching the right people with your message.

Traffic is the act of putting your offer or message in front of your target audience.

This is a quote from the Digital Marketer Paid Traffic Mastery course I completed recently, where I became a Certified Customer Acquisition Specialist.
But, I’ve also been getting a lot of hands-on experience recently with this concept by boosting my own Facebook posts, as well for a client I’m working with to build her new private yoga client business.

There are two parts to creating traffic for your page:

  1. Your Offer or Message: What you actually are saying to your audience (which I believe should be a combination of Edu-tainment, Customer Success Stories, and Offer Content).
  2. Your Target Audience: The people you’re actually trying to reach.

You need both pieces, otherwise you’re not going to get the traffic you need to grow your business with your content.

So, how do you figure out who your target audience is, and how do you create that audience in Facebook, so you’re boosting your posts to the right people?

5 Steps To Help You Actually Reach Your Dream Customers With Your Facebook Boosts

  1. Dream About Your Dream Customer
  2. Set Up Facebook Business Manager
  3. Create A Saved Audience
  4. Boost A Post To Your New Saved Audience
  5. Test It Out & Adjust As Necessary

Step 1: Dream About Your Dream Customer

Before you can dig into Facebook and create that audience, first you need to do some dreaming.

via Gfycat

Honestly, this is the fun part. Do some dreaming, some brainstorming about who you want to work with.

Who do you want to serve?

Who do you want to help?

Get as specific with this as you can. It will help you later, I promise!

You can even name this person, if you’d like, and draw or find a picture of what you think your dream customer would look like.

It will help you to really visualize who you’re talking to when you’re creating content, and targeting your audience.

I’ve created a free worksheet to help you with this process. You can download it, fill it out, and then print it and post it up so you know who you’re trying to reach when you’re creating your Facebook audience later.

It can also help you when you’re creating content to share with your audience that they’ll appreciate. It may even help as you’re creating (or updating) your products or services for your customers.

Here’s what you should ask yourself about when you’re visualizing your dream customer:

Demographics:

  • Age
  • Gender
  • Marital Status
  • Number/Age of Children
  • Location
  • Occupation
  • Job Title
  • Annual Income
  • Level of Education
  • Any other details to note

Bonus: Write down a quote that you think your dream customer would say (or if you have a dream customer already, something that they’ve said to you before that sums up who this person is and what they need from you).

Goals & Values

  • What are your dream customer’s goals?
  • What are their values?

Sources of Information

  • What kind of books does your dream customer read?
  • Magazines or publications they read?
  • Blogs or websites they read or follow?
  • Organizations they belong to or conferences they attend?
  • Tools or resources they use?
  • Gurus they follow?
  • Other?

Get specific with this section.

List actual books, magazines, blogs, etc. that you think your dream customer would read.

Don’t know? Then Google it.

Look on Amazon for the top rated books in your niche.

Search Google for top blogs in your industry.

Try to get as specific as you can with this section — I promise it will help you when you’re creating your audience later!

Challenges & Pain Points

  • What are your dream customer’s challenges right now?
  • What are their pain points?

If you don’t know, then start asking.

If you already have customers, ask them what their challenges are right now.

If you don’t have customers, then talk to people who could be customers of yours.

Start having conversations with potential clients and ask them what their challenges are and where they need help.

Join Facebook groups that your target audience would be a part of and start reading and commenting on people’s posts.

Google your target audience and see if you can find forums, LinkedIn groups, or just discussions online where people are asking questions about the kinds of things you’re trying to help with, and see what they’re saying.

Another useful tool for this research is the website Answer The Public. You can type in a search term, like “yoga,” for example, and see all the different things that people search for on Google with that term in it.
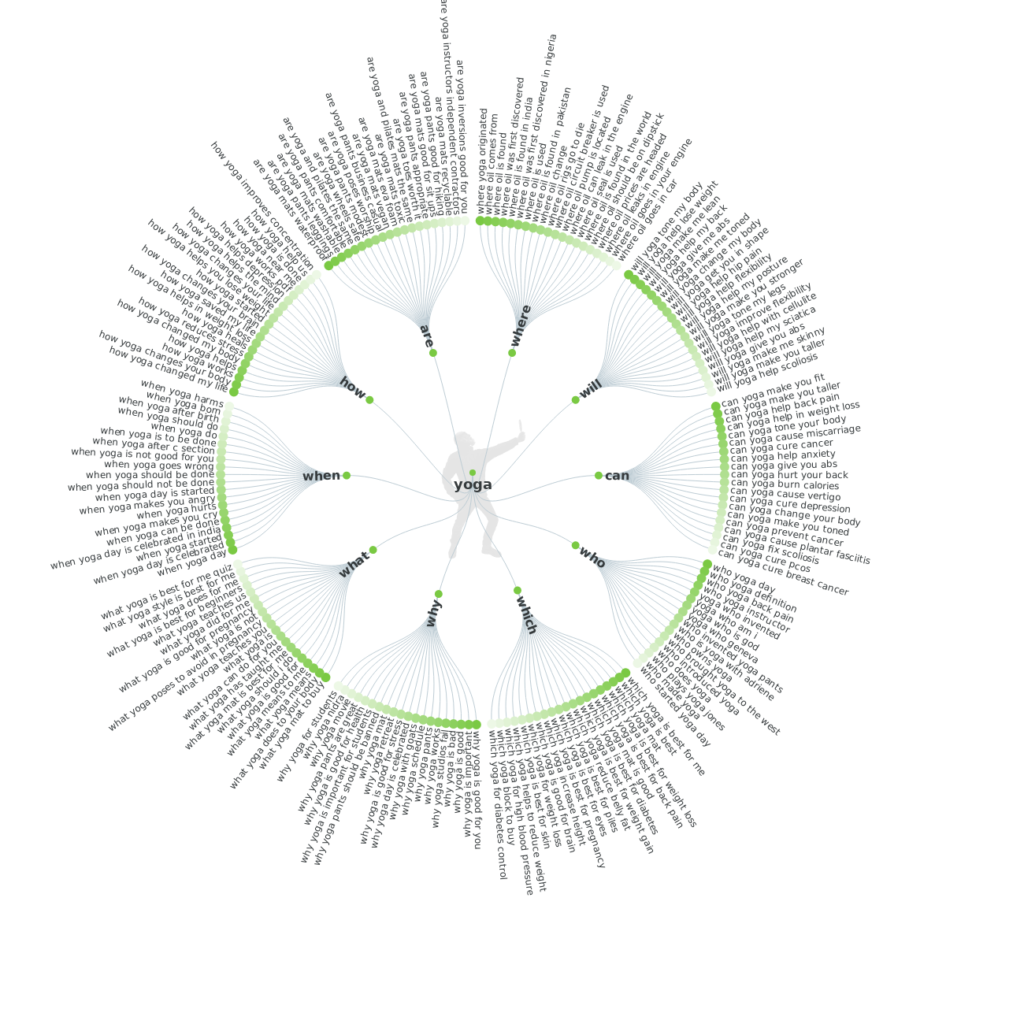
All the questions people Google with the word “yoga” in the search term. Click image to enlarge.
Source: https://answerthepublic.com/

Objections & Role In Purchase Process

  • Objections to the sale
  • Role in the purchase process

If you’ve had customers (or potential customers) before, then what have they said to you in the past about why they won’t buy?

If you haven’t, then what do you think an objection would be? Again, if you can actually start talking to real people, this helps a lot.

And, are they the decision-maker for making this purchase, or do you think they’d have to include someone else in their decision-making process (even a spouse or partner)?

Take some time to go through each of these questions.

Download the free worksheet I created to help you start visualizing your dream customer before you move on to the next step.

Step 2: Set Up Facebook Business Manager

Okay, now we’re moving out of dream land, and down into the technical details.

via Gfycat

First, you have to make sure that you have Facebook Business Manager set up for your Facebook Business Page.

And, even before that, you have to have a Facebook Business Page (not just your personal Facebook profile).

If your business is just getting started, and you don’t have a Business Page set up yet, you can follow these easy instructions from Facebook to get your Page set up:

How To Set Up A Facebook Page

Or, just start going through the Create A Page process on Facebook.
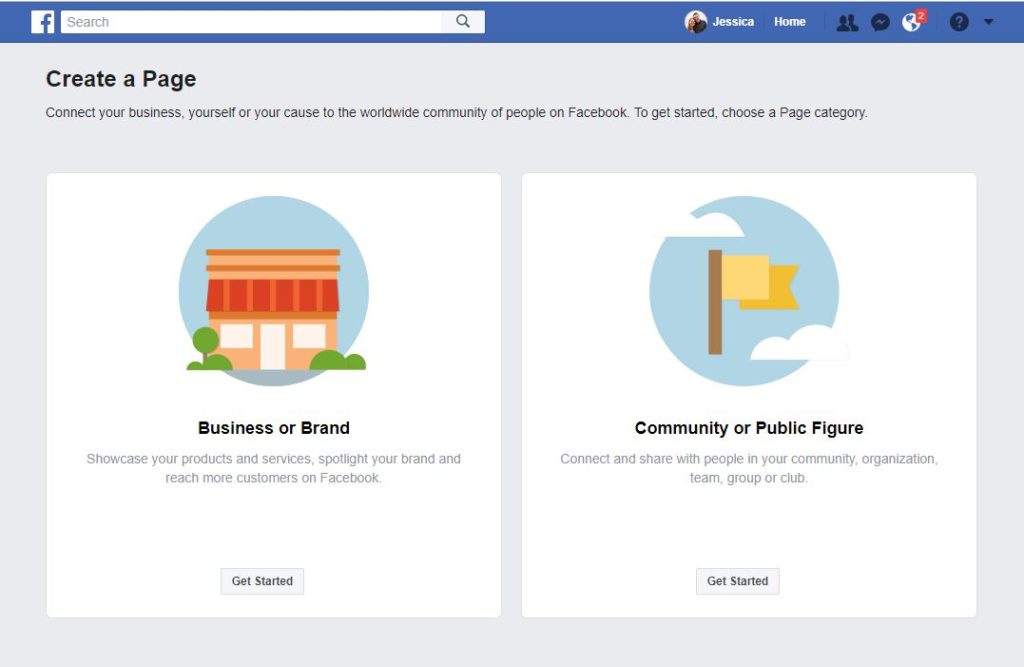
https://www.facebook.com/pages/creation/

Once your Page is created, or if you already have a Facebook Page, next you’ll need to set up Business Manager.

Facebook also has easy to follow instructions to do that:

How Do I Sign Up For Business Manager?

Business Manager is just the back-end tool that you use to manage your Facebook Business Page, any ads you have going, and what you need to create an audience to target when you’re boosting posts.

If you’re planning on doing any kind of Facebook advertising or boosting of posts on your Page at all, it’s a good idea to get Business Manager set up for your Page.

To access your Business Manager account later, go to https://business.facebook.com.

If you happen to have multiple Facebook Pages (for multiple businesses, etc.), you can access each of them through Business Manager.

Once you log in to Business Manager, you’ll see each of your Pages that you have access to listed, and you can just choose the one that you want to go to.

Step 3: Create A Saved Audience

Now that you have your Business Manager account set up, it’s time to dig in and create that audience!

Go to https://business.facebook.com, and log in to your Business Manager account.

In the top left corner of the screen, click the menu bar that says “Business Manager.”

Then, under the “Assets” column, click “Audiences.”
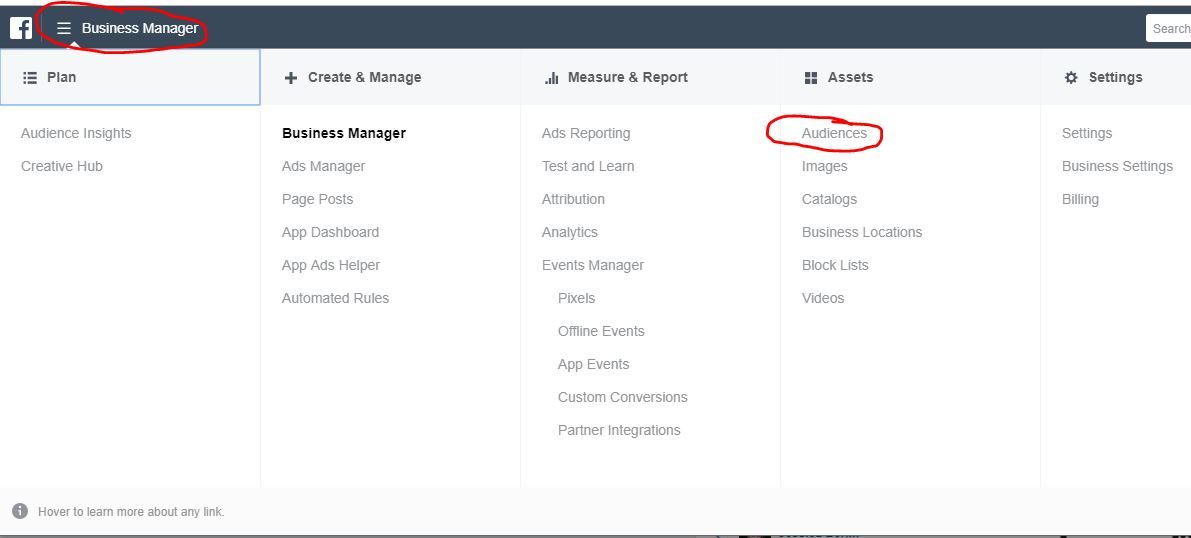
In the Business Manager Menu, select “Audiences.”

Once you’re in the Audiences screen, click the blue Create Audience button and then Saved Audience.

Then, you’ll get to the screen where you can actually create your Saved Audience, which looks like this:

Let’s go through each section…

Audience Name

You can name your audience whatever you would like, but you may want to create a couple different audiences to test out, using different qualifiers and targeting.

So, you may actually want to save the audience naming until after you’ve done the rest of the targeting, so you know how to name the audience (based on who you’re actually targeting).

Custom Audiences

For now, don’t worry about this section.

Custom Audiences are a different kind of audience, and not something you need to deal with right away.

They’re based on things like the people who have visited your website or a particular blog post on your website, or people who have engaged with you on your Facebook Page. You can even create an audience on Facebook from your existing email list too.

One side note about Custom Audiences …

If you’d ever like to retarget people that have been to your website before (aka, show an ad or boosted post to someone who’s shown an interest in you before), then you’ll need to make sure you set up a Facebook Pixel on your website.

Here’s a quick tutorial on how to set up your Facebook Pixel.

But, for now, don’t worry about it.

Put that on your to do list for later, if it’s something you’re interested in (or, if you’d like some help getting all of this set up, let me know — I can help!).

Locations

If your business is local, like you’re a yoga studio or teacher that only teaches in a particular area, or your a chiropractor’s office, etc., then you’ll want to make sure you set your location to your local area.

If you are an online business or can reach a larger audience, you still may want to set at least countries that you’d like to serve (or that at least speak the same language as you!).

When I’m doing my Facebook ads and boosts, I often set my location to United States, Canada, and United Kingdom.

But, if you’re more local, you can also include your business address (or just the city you’re in), and then you can change the radius from that point (10 miles, 25 miles, etc.).

One other note about locations.

There’s a drop down menu at the top of the section that defaults to “People who live in this location.”

Most likely, that’s the option you want, especially if you have a local business.

The other options are:

  • Everyone in this location
  • People recently in this location
  • People traveling in this location

If you want to include people who are traveling in your location, you may want to select one of those options.

Age, Gender, Languages

Usually, I leave all of these options just as they are in the defaults (18-65+, all genders, and leave languages empty).

If you are targeting a specific age group or gender, you may want to change those.

Detailed Targeting

This is the part where it starts to get interesting.

This is how you narrow your audience down by their interests, their employer, their job title, behaviors, school they went to, and SO many other things!

Go back to your Dream Customer worksheet that you completed in Step 1.

What are they interested in?

What do they do?

Where do they work?

What’s there job title?

What books (or authors) do they read? (Yes, you can even type authors in here!)

What tools or resources do they use?

Start typing things in to that Detailed Targeting box and see what comes up.

Not everything you type in there will be an option in Facebook, but many things will, so start trying things out and see what you come up with.

You may want to create a few different audiences that just include some of the features of your dream customer (rather than throw every single descriptor you could ever think of to describe your audience in here).

For example, I have a few different audiences that I’ve been trying out to reach my own dream customers.

I’m trying to reach yoga studio/business owners with my content, so I created an audience that includes all of the different types of yoga, as interests, that I could find in the detailed targeting listing (i.e. Yin Yoga, Bikram Yoga, Hatha Yoga, etc.) in the main Detailed Targeting section.

But, then, in order to try to reach business owners, and not just everyone in the world who is interested in some type of yoga, I click the link at the bottom that says, “Narrow Audience”.
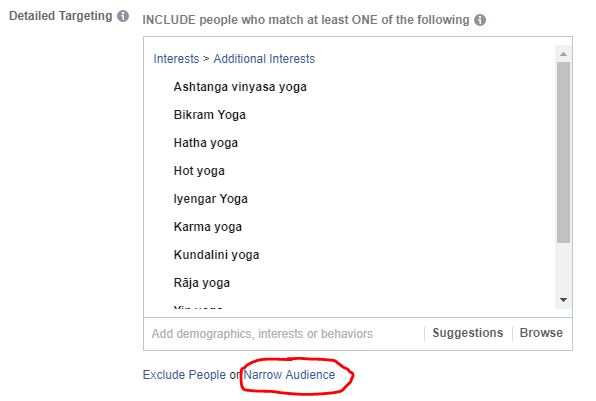
Once you click that button, then you have another box where you can type in more interests.

This is narrowing your audience — the people in your audience must match at least one of the interests from the first box AND they must also match at least one of the interests from the second box.
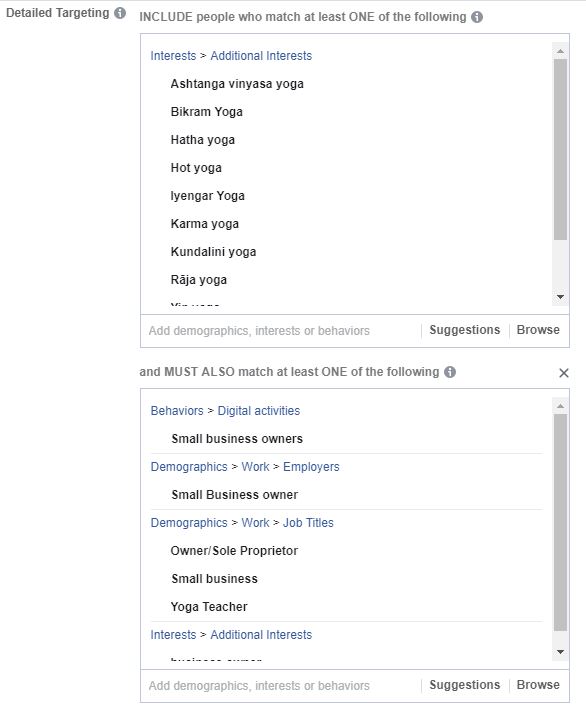
So, you want these things to be different — for example, I broadly targeted everyone interested in yoga, but then narrowed down to business owners, yoga teachers, yoga teacher training, etc.

This helps you focus your audience down to people who may actually fit your particular criteria for your dream customer.

Use your Dream Customer worksheet.

Who are you trying to reach?

How could your narrow your audience down further to really reach the people you want to talk to?

Once you have a couple interests typed in, you can also use the “Suggestions” button to help you find interests similar to what you have typed in already, which may give you some good ideas that you hadn’t thought of before.

As you’re creating your audience, Facebook will estimate the size of your reach in the top right of the Create Audience screen.

If you have a local business, your audience size will be largely dependent on the location you are targeting, and you may only want to include a few interests in your detailed targeting, because mostly you are just targeting the people in your local area.

But, if your business is online, and the location doesn’t matter, ideally your audience size should be between 500,000 to 3 million people.

That size will give you the best results and reach for your ads.

So, if you’re creating an audience and it starts to get too large, break up the interests into a couple different categories and create a couple different audiences from them.

You can always run ads or boost posts to several different audiences to test them out and then see which one performs the best.

Connections

I don’t usually use this section at all, but it could be something to look into, especially if you already have a large following on your Facebook Page.

You can tell Facebook to either include (or exclude) people who like your Page, or friends of people who like your page, responded to your event on your Page, etc.

Depending on who you are trying to reach with your boosted posts or ads, you may test out this feature as well.

Remember, you can create and test out as many different audiences as you’d like.

There’s no limitation on the number of audiences you can create.

Just make sure to name them with a good description, so you can keep track of them, and then test them out and see what happens!

If you need help setting up these audiences, or creating the strategy behind creating them, let me know — I’d love to talk!

Step 4: Boost A Post To Your New Saved Audience

Once you have your audience created and saved, it will always be there when you go to boost a post from your Page!

When you have a post that you’d like to boost, go to your Page and click the blue “Boost Post” button under that particular post.

It will bring up this screen:
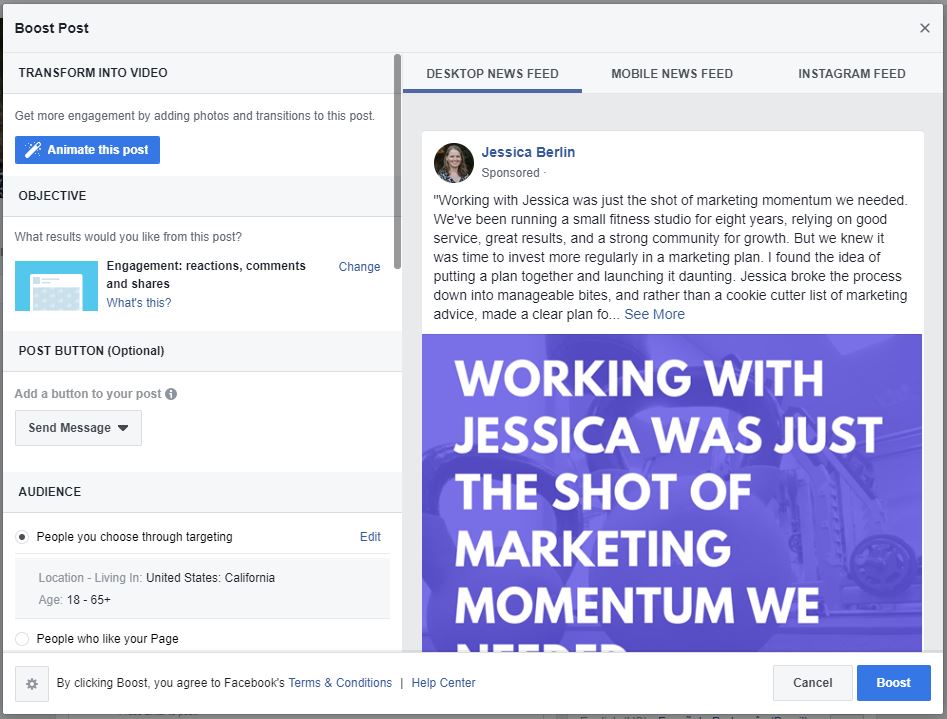
Let’s go through each section.

Objective/Post Button

The first thing you have to think about is what your Objective is for this boost.

Depending on the kind of post, you may have different options for your Objective in a boost.

The default for this one is “Engagement,” which means I want people to like, comment, and share my post.

If you have a link to your website or a blog in your post, then you may have an option to get clicks to your link.

Or, one other option is to get Messages, which means having people send you a message (through Facebook Messenger) who see the post.

So, choose your objective.

Then, you can include a button on your post, like “Send Message” or “Learn More,” if you would like.

Audience

Then, you get to the Audience section.

As you can see, the default for my post is to just boost to everyone in the United States, California, that’s 18-65+.

But, that is not my target audience.

So, I’m going to want to scroll down and choose which audience I want to boost this post to.
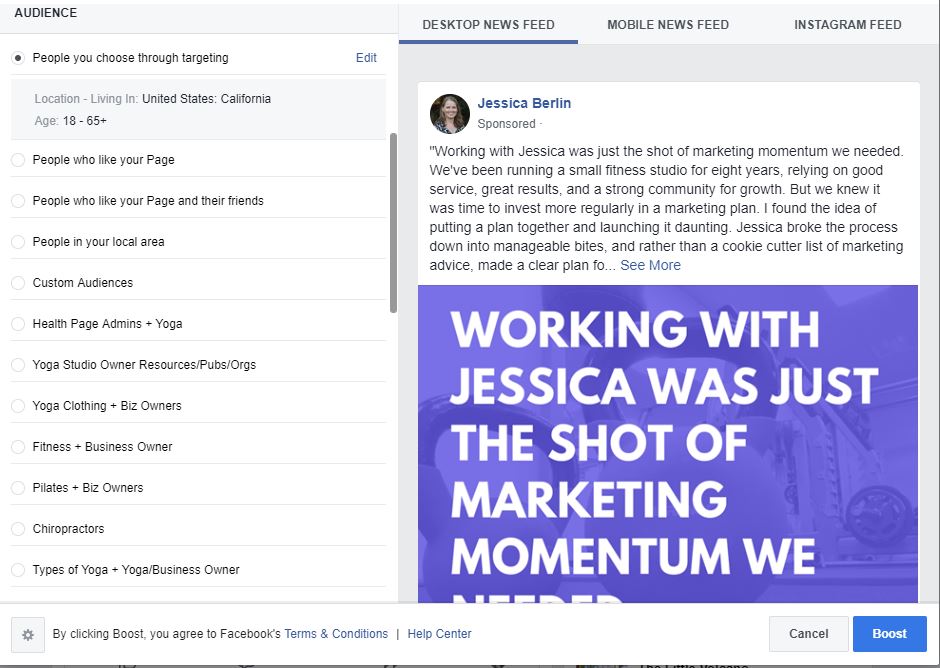
There are some standard audiences that Facebook includes for you, like People who like your Page, People who like your Page and their friends (this is a good one if you have a lot of people who like your Page already), and People in your local area.

But, if you keep scrolling (or you may need to click “See All”), you’ll be able to see your Saved Audience(s) that you created in your Business Manager in Step 3.

Select the audience that you want to boost your post to.

One other thing you can change is the Placements.

By default, Facebook selects “Automatic Placements” (which they recommend leaving on).

If you turn it off, you can choose where you want your post to show up — Facebook, Messenger, or Instagram.

If you don’t want it shown on Instagram or Messenger, you can unselect those options.

Budget and Duration

To start out, I would suggest boosting your post to your selected audience for $7 for 7 days ($1 per day).

This gives you a chance to test out your new audience for a pretty low investment and see how it performs.

If you’ve created a couple different audiences, you could boost the same post to both audiences (each for $7 for 7 days) and that would test out the audiences and you could see which one performs better.

Tracking Conversions

If you have your Facebook Pixel set up for your website (you should!), then make sure this is turned on and the correct Pixel is selected to use for tracking.

Payment

Make sure you have the correct Ad Account/payment method selected.

If you happen to have multiple Ad Accounts for different businesses (or, like me, you are included on Ad Accounts for your clients), just make sure you have the correct one selected before you boost your post.

After that, just hit that big blue Boost button, and you’re off!

Step 5: Test It Out & Adjust As Necessary

You can see some basic information about your posts and boosted posts right from your Facebook Page.

When you’re on your Page, click the Insights button on the top bar, then click Posts in the left sidebar.

You’ll be able to see a list of all of your posts, along with the Reach (how many people saw your post) and Engagement (how many people liked, commented, shared your post).
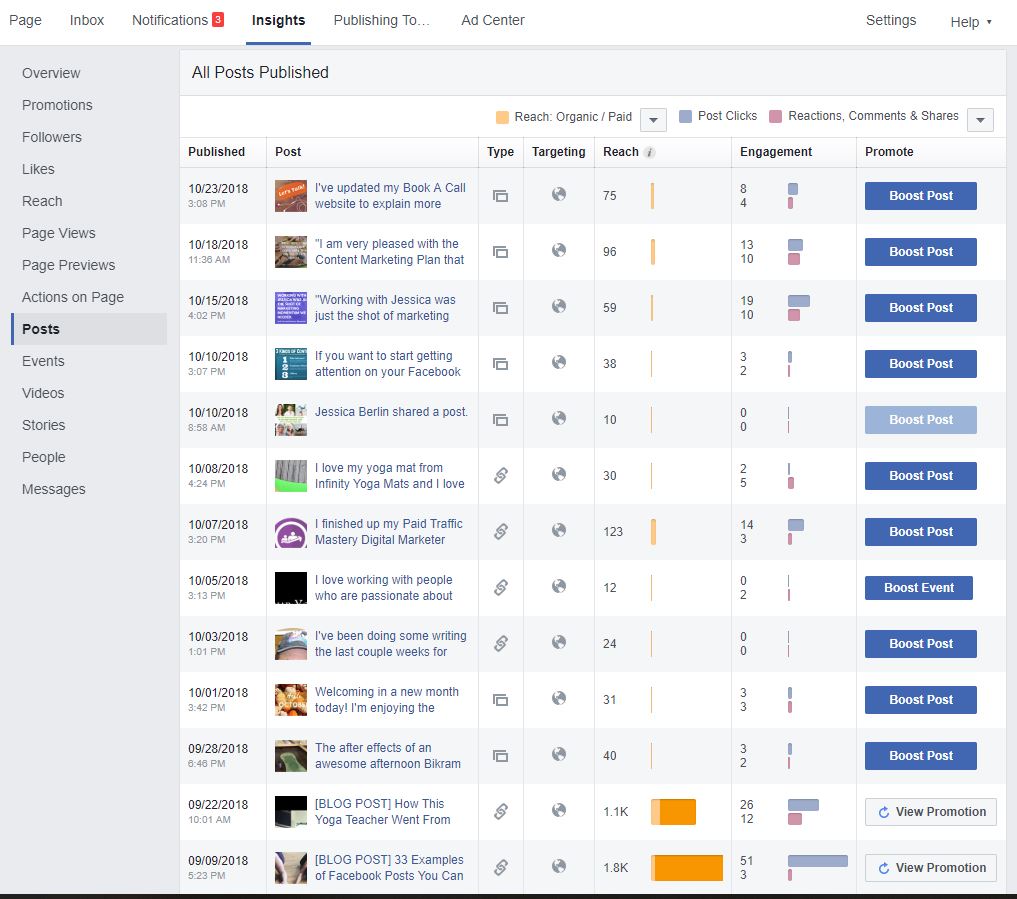
This may be enough information initially to test out different posts and audiences and just see how they do.

If you’d like to get more detailed about the performance of your boosts and your audiences you’ll need to log back into Business Manager and go to your Ads Manager.

Ads Manager has a lot of information and can be overwhelming, especially if you don’t know what you’re looking for.

But, a few things to take a look at include:

  • Cost Per Result: You want this number to be as low as possible, especially if the result you are going for is link clicks — under $0.50 per click is great!
  • CTR (Link Click-Through): This is your link click-through rate. You want this to be a high percentage, above 1% is good, but the higher the better.
  • Relevance Score: This is a number from 1 to 10, and you want it to be as close to 10 as possible, but 7 or higher is good. You won’t get a Relevance Score until you’ve had at least 500 impressions on your ad, so it may take a while to get a Relevance Score, depending on your audience size and your budget. But, this is a good number for testing the quality of your audience — it tells you how relevant the audience you’re advertising to thinks the content you’re sharing is to them. So, it can tell you if you’re advertising to the right audience or not.

Feel free to test out different audiences, different post boosting, and see how things go.

Check out this post with 33 examples of the different kinds of content you can share (and boost!) to your audience.

Recap

You CAN start reaching your dream customers, even with boosted posts on your Facebook Page!

You just need to make sure you set up your audiences in Facebook, and don’t just use the defaults when you boost your posts.

There are five steps to do this:

  1. Dream About Your Dream Customer: Who are you trying to reach? Write it down. Use my free Dream Customer worksheet to help you figure it out.
  2. Set Up Facebook Business Manager: Create your Facebook Page and get Business Manager set up (if you haven’t already).
  3. Create A Saved Audience: Go through the steps I listed above to create your Saved Audience (or more than one, if you want to test out different options). Use the details you included in your Dream Customer worksheet to help you with the detailed targeting.
  4. Boost A Post To Your New Saved Audience: Go back to your Facebook Page, share content, and choose a post to boost. Make sure you select that Saved Audience you created, rather than the defaults that Facebook chooses for you.
  5. Test It Out & Adjust As Necessary: Let your boosted post run for 7 days ($1/day) and see what happens. What kind of reach and engagement did you get? If you want to get more detailed, check out Ads Manager (within Business Manager) and look at your Cost Per Result, CTR, and Relevance Score.

Need Help?

If this all still seems like too much for you, or if you’d rather focus on the parts of your business that you love and let someone else handle Facebook for you, then I can help!

I love getting into all the nitty-gritty detail of Facebook audiences, posts, boosts, and ads, and I would love to help you bring in more of your dream customers through your Facebook content and boosts!

I help health and wellness businesses consistently bring in new clients every month using Omnipresence Content Marketing.

Let’s schedule a call to talk about your business and the challenges you’re facing right now.

If you would like your business to become Omnipresent to your dream customers, let’s schedule a call today.

33 Examples of Facebook Posts You Can Use To Become Omnipresent To Your Dream Customers

“I need to reach more people.”

“I want to share my love of yoga … fitness … healthy eating … massage … chiropractic care … wellness … healing … intuition … feeling good … with more people.”

“I started this business to help people ______.”

The businesses that I’ve worked with all have these same goals, and I’m sure you do too.

You want to help people.

And, I want to help you share your gift with more people — more of your dream customers.

But first, you need to be able to find and reach those people.

You need to become Omnipresent to your dream customers.

Omnipresent means that the people you want to help know who you are.

You are familiar to them — a familiar friend.

They see you, your business, and how you help people all the time.

They know what you’re offering, and when they’re ready to be helped by you, they know how much it costs and how to purchase.

How do you do all this?

I use a system called Omnipresence Content Marketing where you create consistent, valuable, straightforward content on your business Facebook page.

Then, you use the data that Facebook gives you on the posts to strategically boost the posts that do the best for $1 per day.

I’ve outlined this method in the post, “How To Get Your Wellness Business In Front of 100 Of Your Dream Customers For $1 Per Day.”

In that post, I recommend creating three kinds of content to post on your Facebook (and/or Instagram) page:

  1. Edu-tainment Content: Educational, yet entertaining content. Valuable info for your audience. Lists, pictures, links to blog posts are all great.
  2. Customer Stories Content: Successes your customers have had. Before and after pictures. Client testimonials.
  3. Offer Content: State what you’re selling and how much it costs.

But, after reading that post, you may be asking yourself, how do I really write this content?

What kind of posts should I be writing?

What’s wrong with what I already post — can’t I just use that?

I’ve spent the last several days scouring Facebook for really good examples of the three kinds of posts I’ve recommended, and, let me tell you, there aren’t a lot of health and wellness businesses doing this!

Here’s what I see instead:

  • Daily schedule (for a yoga/fitness studio)
  • Sharing memes/text images with motivational/inspirational quotes
  • Pictures of stuff going on in the studio/business
  • Upcoming events
  • Limited time deals/promotions

These are all good things to post on your Facebook page, but if your goal is to reach more of those dream customers, you need more than this.

You need evergreen content that you can write once and then share, boost, and promote all year round.

You can’t promote a Labor Day or Back To School sale all year long.

You can’t keep sharing an upcoming event all year.

You can’t boost today’s daily schedule all year round.

So, to really show you what I mean by the kind of content I’m talking about creating to help your business become Omnipresent with your dream customers, I’ve pulled 33 examples of Facebook posts that could do just this.

Table of contents for quick reference later:

  1. Edu-tainment Content Examples
  2. Customer Stories Content Examples
  3. Offer Content Examples

11 Edu-tainment Content Examples

Edu-tainment Content should be educational, valuable, informative, but also entertaining content that your dream customers will enjoy.

But, make it timeless.

Make it something that could be seen any time of year, so that it can continue to provide value to your dream customers again and again (through $1/day Facebook post boosting).

Good examples of this kind of content includes lists, tips, recipes, links to blog posts that have more of this kind of information, infographics, videos.

This content should NOT be selling something.

JUST provide the information to your customers, so they can start to learn more about you and how you can help them.

And now, 11 examples of real life Edu-tainment Content, pulled straight from Facebook.

1. DailyOm

This post includes good information, recommendations for their audience.

There’s a nice picture with a quote (these kind of images are easy to make on your own with programs like Canva).

And, they link to a full article about foot cleansing rituals that has more of the information.

To make this post even better, they could break up the text.

Give quick, simple tips that are easily digestible for Facebook users, then link to the full post for more info.

2. InstaPhysique

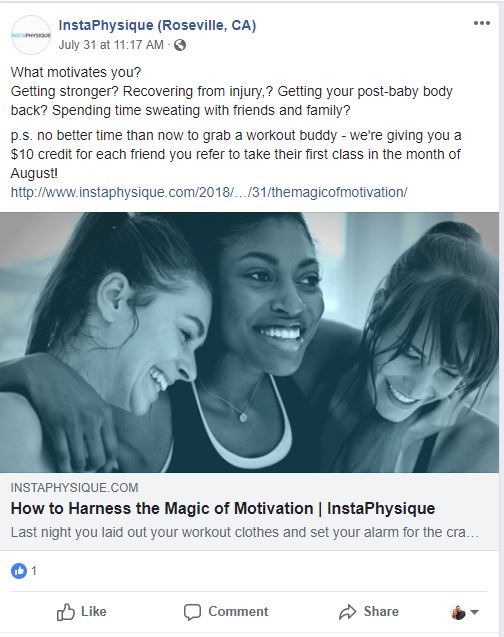
Asking a question is a great way to engage your audience on social media. This is a link to a blog post — great for Edu-tainment Content, and includes a picture that their audience can relate to.

To make this post even better, they could make it timeless.

Why not have the $10 credit for each friend someone brings in all year round? Then you could boost this post all the time to help you bring in more students.

3. Farm Fresh To You

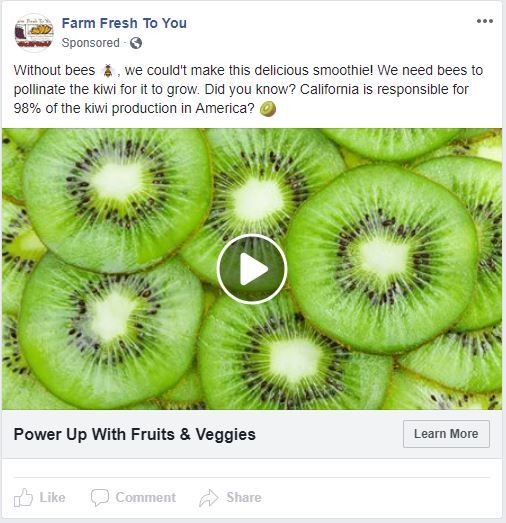
I love the emojis they included in this post! This includes a great brief summary of the video, an interesting tidbit of knowledge about kiwi, and the video is awesome!

Lots of cool educational info, tips, fun facts, and a recipe. They’re not selling anything in this video, or in the link that the Learn More button goes to.

They’re just providing amazing info to their audience, teaching them more about the products they offer, and reminding them how awesome they are.

4. Caring Nature Wellness

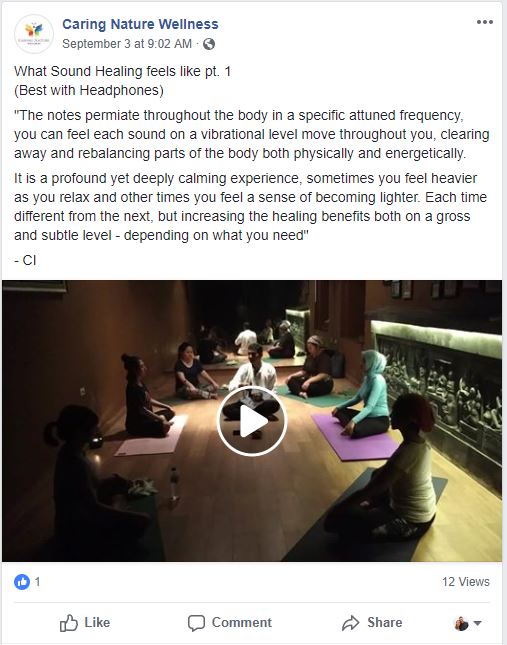
Posting a video of what you do, showing how you can help people, is great to post as Edu-tainment Content, like Caring Nature Wellness does in this video post showing their sound healing session.

Give a description in the copy of what they’re watching. There is no sales message to be seen here — just information, education, and beautiful sounds.

5. Caring Nature Hypnosis

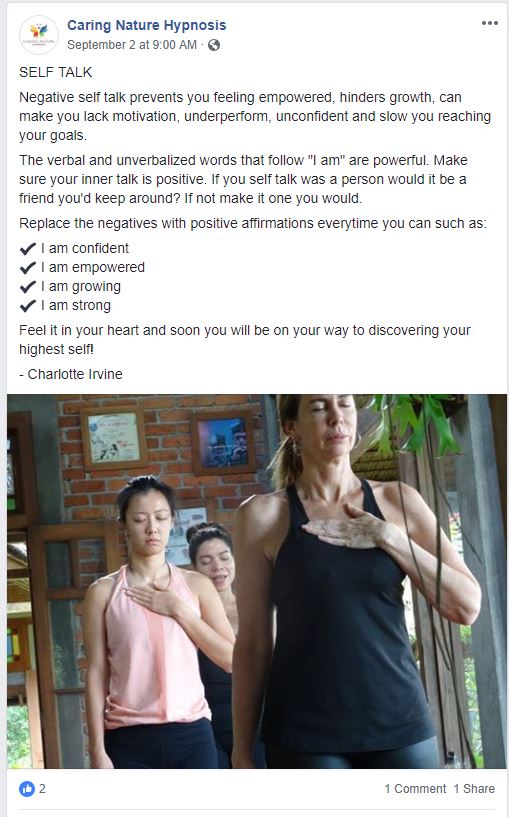
A checklist of actionable items is great to share (checklist emojis are a fun bonus!).

This is good advice that their dream clients would take to heart and use.

I also love the picture — it shows feeling, emotion. It shows how their dream clients will feel when they take this advice or use their services (without selling!).

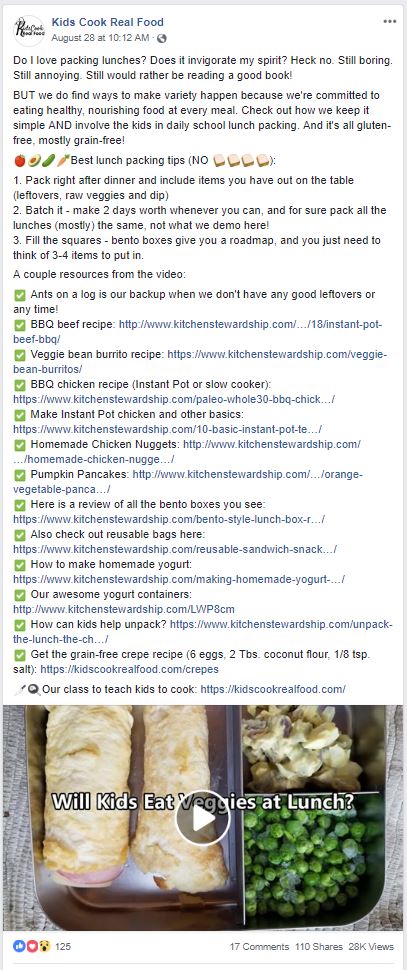
6. Kids Cook Real Food

This is such a great post!

It’s long, and that’s okay! Facebook posts can be long.

But, look at all the amazing content that is shared in this post!

A short list of great tips for packing lunches. And then a long list of recipes this company has shared in this amazing video.

I love the combination of the really useful video with lots of great content on it’s own, but then also including so many resources that people can go back to, save, and really use!

This company’s dream customers will get SO much value out of this post, and you can see that from all of those reactions, comments, shares, and views this post has received!

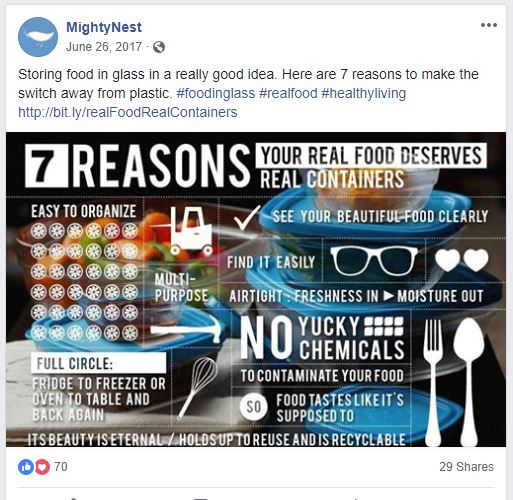
7. Mighty Nest

What a great infographic!

If you have the resources to create graphics like this, you definitely should! (You can also try to do it yourself with apps like Canva.)

They could also have just listed these 7 reasons out in the copy of the post, if they didn’t have a way to create this graphic.

Take note that many of these posts that use a list have an odd number (5, 7, or 33 in this blog post you’re reading now!).

For some psychological/marketing mumbo-jumbo reason (that’s a technical term), odd numbers in headlines tend to do better for social media or blog posts, so try to use odd numbers in your lists.

This post also links to a blog article with more information about switching from plastic containers. Blog posts do well as Edu-tainment Content — make sure you’re providing value, and not just selling.

8. Flourish Fit and Well

This is a great list of valuable information for their dream clients, directly in the copy of the Facebook post.

Your posts don’t always have to link to a blog post or video. You can just include the copy directly in the Facebook post, and it’s okay if it’s long!

I also like the “Send Message” call to action button here, especially if they were using this as a $1 per day boosted post.

They’re not selling anything, but they’re still giving a call to action to send a message if they want to know more about what they have to offer.

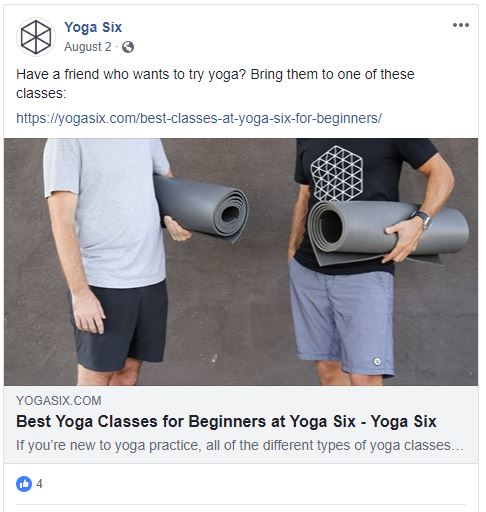
9. Yoga Six

This is a good blog post piece of Edu-tainment content for this yoga studio.

It’s listing out their different types of classes, but not in a salesy way.

Rather, they’re saying, here’s our classes that would be good to bring a friend who’s new to yoga.

They could have also just listed out (and numbered!) the different class types in the Facebook post directly.

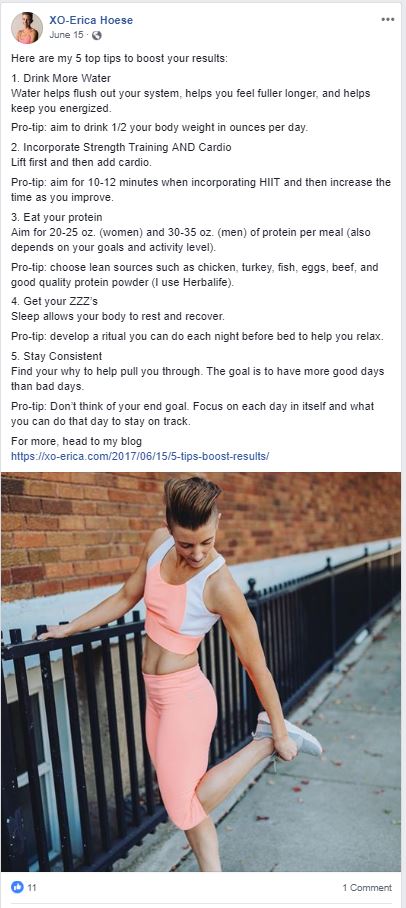
10. XO-Erica Hoese

This is another great list of tips that is timeless.

Erica could boost this post for $1 per day all year round, and continue to provide value and become Omnipresent to her dream customers.

If they see this post again and again, they’ll remember her, and know what she stands for and how she can help them.

I love the picture here too. And, this is another one with a link to a blog post, but I like that she summarized the post and actually put the 5 top tips here in the Facebook post copy.

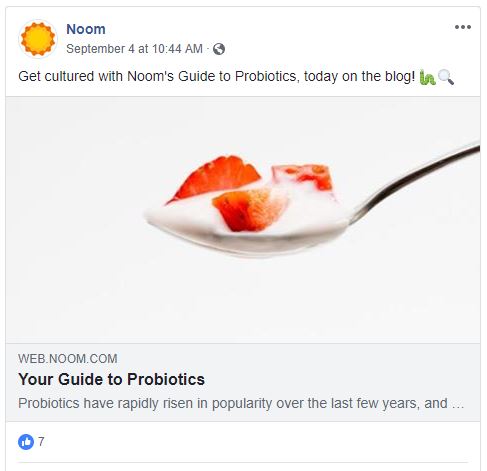
11. Noom

This one is a very simple link to a blog post, but it’s timeless, could be shared again and again, and it’s eye-catching.

They could have included some of the content of the post, a few tips or highlights in the copy of the Facebook post, but this is also good as it is.

Edu-tainment Content Tips

  1. Provide value first. Show them what you have to offer.
  2. Avoid selling. Save that for the Offer Content.
  3. Use numbered lists (an odd number is good!).
  4. Link to blog posts, but provide a summary of the post, or some highlights in the Facebook post copy.
  5. Nice images or videos are always great!

Jump to another section:

  1. Edu-tainment Content Examples
  2. Customer Stories Content Examples
  3. Offer Content Examples

11 Customer Stories Content Examples

Customer Stories Content, like the name implies, should be all about your customers.

What successes have they had because of your business?

How has their life improved?

These include testimonials from clients — either written or video.

But, the content doesn’t actually have to be a quote from a client. You could write the story for them (with their approval, of course).

Be on the lookout for great customer stories all the time, and share these as much as you can.

Here are 11 examples of good Customer Stories Content Facebook posts.

1. Yoga on Gaia

This is a video compilation of testimonials from clients, along with music, and words from the testimonials overlaid on the video.

One of the quotes is, “For me, a home practice is the most sacred kind of practice.”

With these quotes, they’re giving proof that they can do what they say they can do — because they’ve done it for others.

They’re also offering a free trial of their service with this particular post (which is more combining the Customer Story and Offer Content into one post), which is okay.

But, you also want to have content that is only telling stories about customers using your service or product.

2. InstaPhysique

This is a great video testimonial from a client of this fitness studio.

The video is less than two minutes long, it shows someone using the machine that you use in this studio, and they wrote out a quote from the testimonial in the copy of the Facebook post.

The video is not highly edited, and looks like it was taken with a phone camera.

These don’t have to be difficult to do, or take a lot of special equipment.

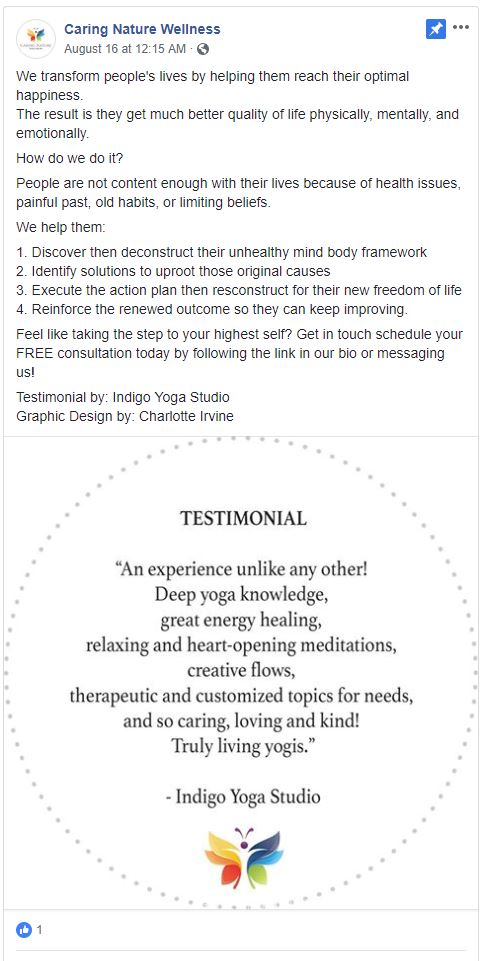
3. Caring Nature Wellness

This is a great testimonial of the kind of work Caring Nature Wellness can do for its clients, and a good example of someone using Canva to make the quote more graphically appealing.

I also like that they added information in the copy of the post about how they provide these kind of results to their clients, and offered a free consultation (again, an offer, which could be a separate post, but is okay here too, especially because it’s free).

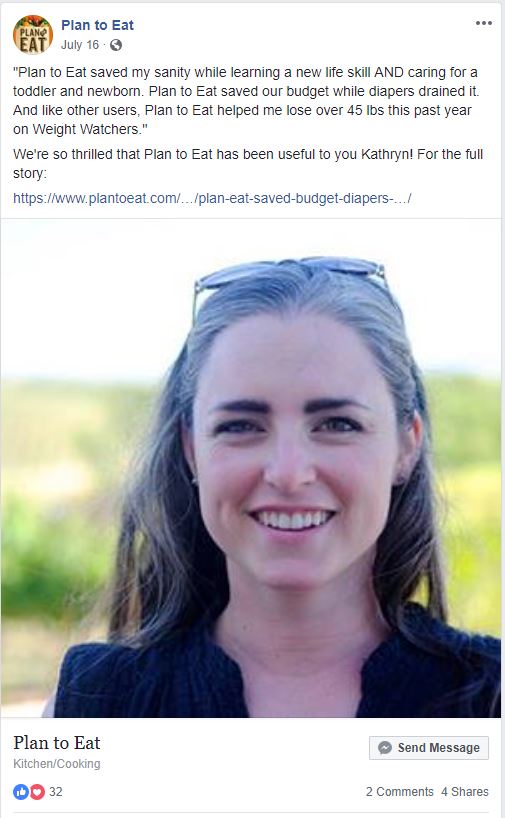
4. Plan To Eat

This is an entire blog post customer story that shows a customer saving money and losing weight from a meal planning app.

If you have a good customer story, a blog post may be in order so you have a chance to really share all the details.

I love that they included the customer’s picture in the post and wrote out a quote from the blog post in the copy of the Facebook post (rather than just: “New blog post up,” like many businesses do).

5. Infinity Yoga Mats

If a blogger or review site writes about your business or product, you should definitely be sharing that!

Outside reviews are great proof for your business.

This is an example of someone else writing a review on their blog about this yoga mat company and then they shared the review on their Facebook page.

But I love that they included a quote from the review, and didn’t just stop at the first line of “Wonderful review from Ariel Kiley,” which many businesses do.

Not everyone is going to click the link and read the post, so try to give them a piece of the full blog post on the Facebook post, so they still see the glowing review.

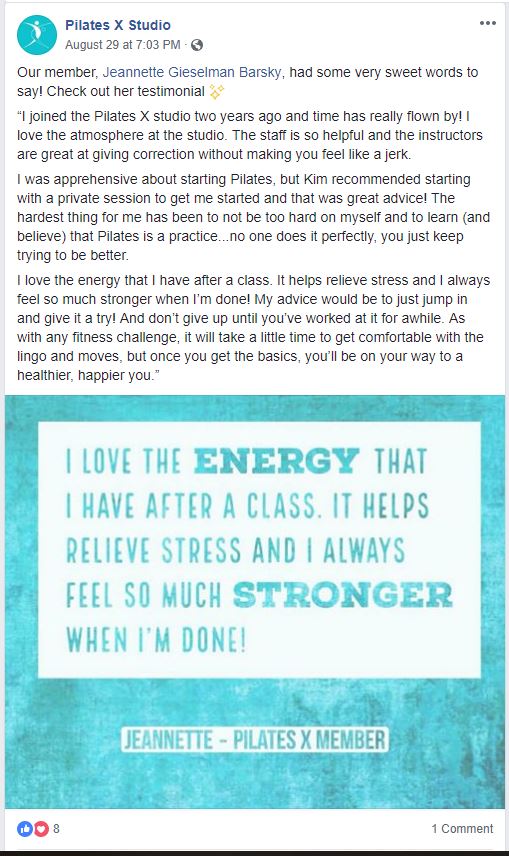
6. Pilates X Studio

This is a long testimonial, but I love what they did with it.

They included the full quote in the copy of the Facebook post, but then also highlighted a portion of the quote with an image (most likely created with a program like Canva).

This is eye-catching and gets the message across even if someone’s just scrolling through, but also provides great proof if they take the time to read the whole thing.

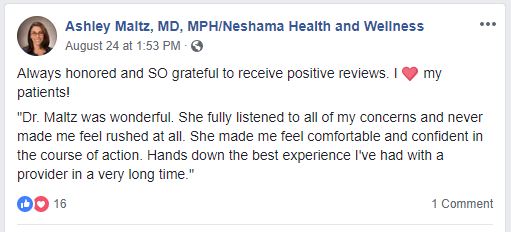
7. Ashley Maltz, MD, MPH/Neshama Health and Wellness

This is very simple, but still effective.

If you have great reviews, you should be sharing them.

Of course, an image to go along with this post would be even better, but if this is all you can do, then do it!

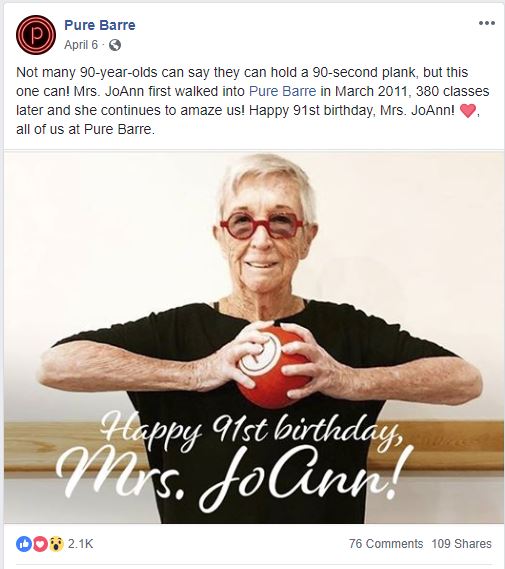
8. Pure Barre

I love this post! It’s not actually a direct testimonial or quote from the client — it’s a Happy Birthday message to her!

But, it’s still proof of what they offer.

A 91-year-old lady can do this, so you can too!

But, I love that it is also recognizing an amazing student for all her hard work.

I’m sure she’s a great advocate for Pure Barre!

9. XO-Erica Hoese

I love the graphical touch to this quote, and the call out in the copy as “Real Results” (emojis are always fun too!).

I also love that Erica is saying how proud she is of her clients — the recognition builds loyal client advocates!

If she wanted to be able to run this post as a $1 per day boost year round, she would need to remove the mention of the Academy opening again in August and just include a link to sign up for the waiting list, or to be notified when the next round launched.

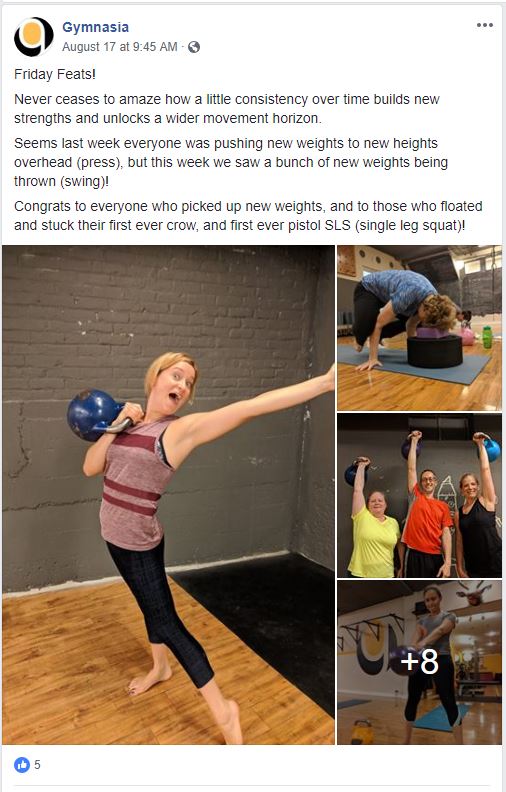
10. Gymnasia

This is not a direct quote or testimonial from a client, but it is showing the success and the progress that clients of Gymnasia make while they’re there.

Pictures of clients making progress and doing things they haven’t done before because they come to your studio are great stories to share!

11. The 21-Day Sugar Detox

Before and after pictures in Customer Stories Content are perfect!

Show that success.

I love that this post includes before and after pictures, but also includes a graphical quote from the customer.

This post links to a blog post with a full customer story about her success.

Customer Stories Content Tips

  1. Show the success of your customers! Be on the lookout for new customer stories all the time.
  2. Ask for testimonials from clients regularly, and then share them!
  3. Pictures of the client or video testimonials from them directly are awesome.
  4. Use Canva to make your quotes look pretty if you don’t have a picture to include.
  5. If it’s a really good story, maybe write a longer blog post and then share that (with a quote too!) in the Facebook post.

Jump to another section:

  1. Edu-tainment Content Examples
  2. Customer Stories Content Examples
  3. Offer Content Examples

11 Offer Content Examples

The final type of content to use with the Omnipresence Content Marketing method is Offer Content.

Offer content is simple (although while looking for examples, I noticed many businesses are NOT doing it).

State your offer, including the price.

Tell them what you are selling, and how much it costs.

If you’re following the Omnipresence Content Marketing method, then these offers will be combined with other pieces of content (Edu-tainment and Customer Stories) that will be providing a lot of value to your customers and showing proof that you do what you say you do.

So, when they see an offer post, it won’t be surprising.

It won’t feel like you’re selling to them, or that the selling you are doing is out of place or spammy.

You’ve shown them what you can do, and now you’re telling them how they can work with you.

If they’re interested, they’ll know how to buy because of these Offer Content posts.

Here are 11 examples of Offer Content Facebook posts.

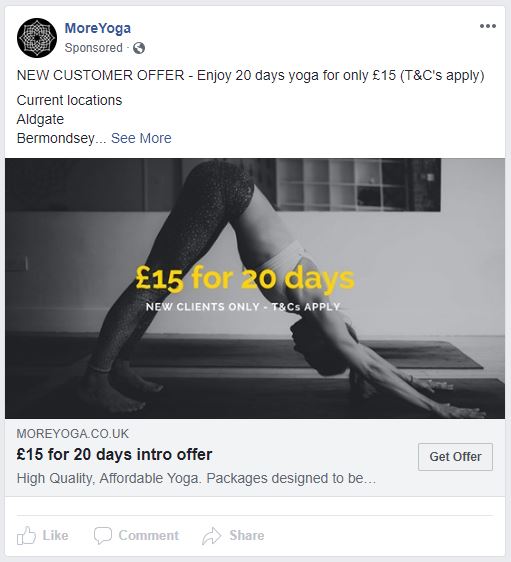
1. MoreYoga

I love how simple this post is.

20 days of yoga for £15.

These posts should be simple. Just state your offer, and tell them how to get it.

I love the “Get Offer” button too, which goes straight to their pricing/buy now page.

2. Yoga on Gaia

This is a video of testimonials, combined with an offer of 11th month is 99¢.

It could be more simple and direct, but this is also a good Offer Content post.

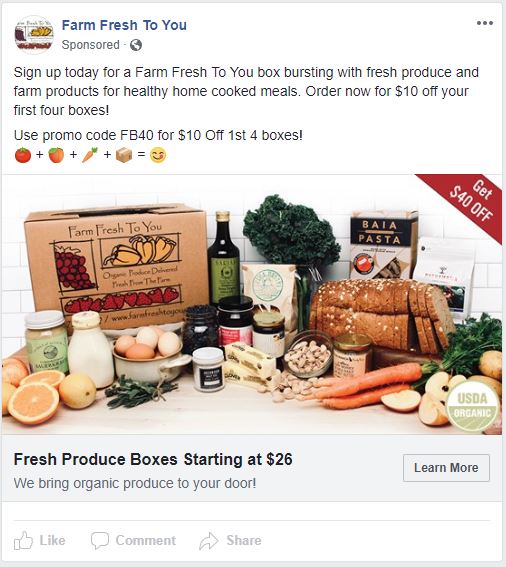
3. Farm Fresh To You

Promo codes are great!

Bonus: if you use a specific promo code for different Facebook posts (especially ones you’re paying to boost), you’ll have another indicator of how effective your posts are based on how many people use that promo code!

I love that this offer is timeless too. They can run this all year round without any issues.

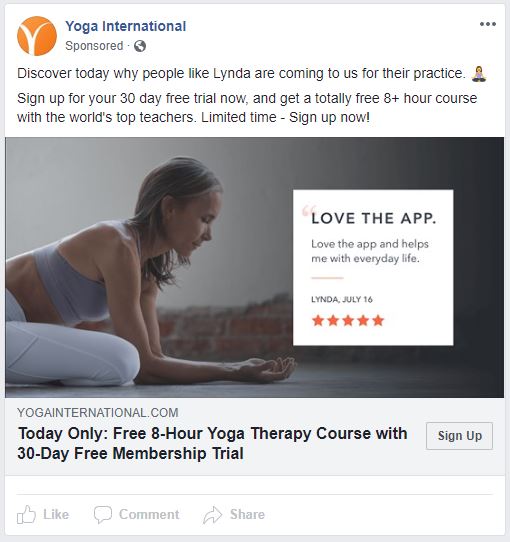
4. Yoga International

I like that this includes a small image of a customer testimonial along with the offer.

One way to make this post even better for the Omnipresence method is to make it timeless.

Offer an intro offer for new customers that could be used any time of the year and you’ll be able to continue to boost the same piece of content all the time.

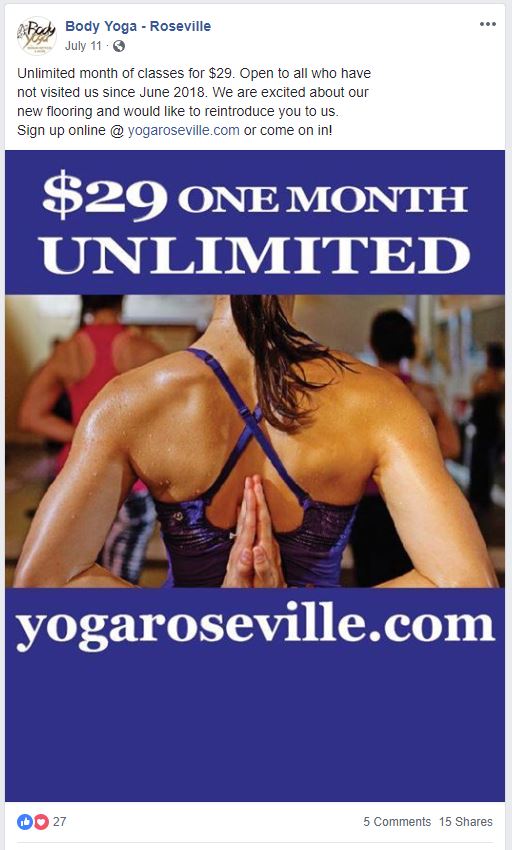
5. Body Yoga

I like the simplicity of this image with the offer stated very clearly in the image.

Again, to make this even better, make it timeless.

State your intro offer that’s good all year round, so you can boost the same post for $1 per day again and again.

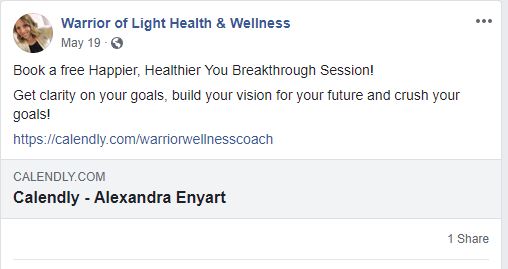
6. Warrior of Light

This is very simple, but clear.

Offers don’t necessarily have to be paid.

A free introductory session is great too, and I love that they include a link to book a session directly on their calendar.

A picture or graphical text would make this post more eye-catching, and they could even include a “Book Now” button on the post to make that call to action even more clear.

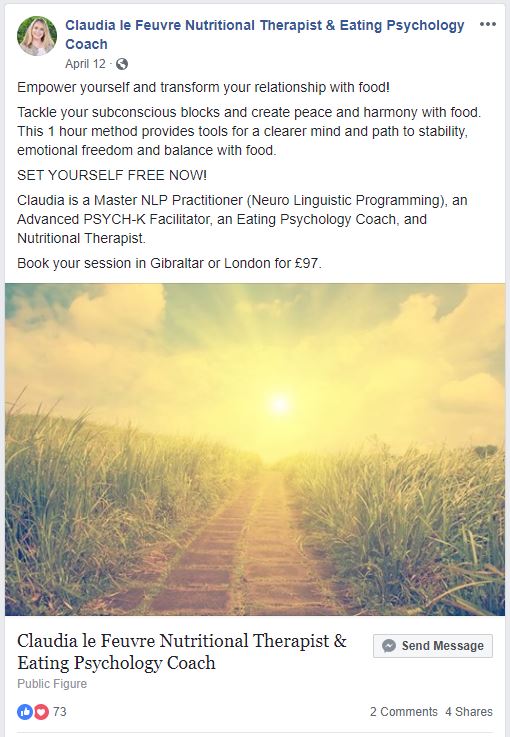
7. Claudia le Fuevre Nutritional Therapist

Claudia has very clearly stated the benefit of her offer, the price, and how to take the next action.

I like the Send Message CTA button too.

She could also have a Book Now link that goes directly to a page to book a session online (including paying up front).

Adding overlaid text on the image with the offer and the price would make it even more clear what she is offering.

8. Joanna Barrett Yoga

I love the list of the four packages that Joanna Barrett has included in this post — very clear about what she’s offering, and a link is included if you want more information.

The picture is also great. It shows who she is, the feeling of calm that you’re going to get working with her.

One thing I would add to this post is the price for these different packages right on the post.

There is no reason to hide your prices. Just tell people what they need to do to work with you, and that includes stating the price.

9. CorePower Yoga

I really love the visual with this post — it’s very clear that they’re offering yoga classes online.

The offer is stated clearly.

A free week of unlimited online classes.

But, I think it would also be great to state the price after the free week right up front. People would rather know up front, rather than be surprised about the price later.

10. Simple Green Smoothies

This is another free 7-day offer — this is great way to introduce people to your service or product.

I like the text overlaid on the beautiful image, and very clear call to action.

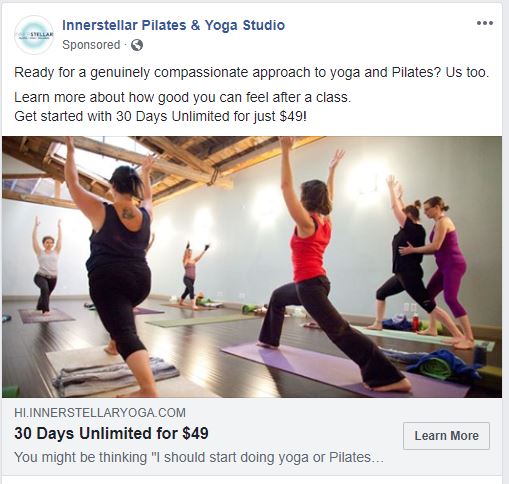
11. Innerstellar Pilates & Yoga Studio

I love the simplicity of this post!

To be honest, it was hard to find a post like this — many businesses aren’t doing this.

State your price up front. This is their introductory offer that’s good for new students all year round.

It isn’t a limited time promotion only good for a month.

This post links to their home page, where they have a button to click to go to their pricing page.

Even better would be to remove the extra click, and go straight to the booking/price page.

You also don’t have to feel like you only have to do Offer posts for new students or clients.

Feel free to also create Offer posts with your offers for existing clients — the cost of a 10-class punch card or for your standard monthly membership fee, after the intro offer.

Offer Content Tips

  1. State your offer — including the price! — up front, right in the post.
  2. Tell them what they get from that offer. Show them the benefits, the problem you’re solving, from your offer.
  3. Link directly to a page where they can book, schedule, and pay now.
  4. Free offers, or introductory offers are good, but feel free to also create posts that include your standard offers.
  5. Pictures are always good! Overlaid text with the offer stated on the image as well is a good way to give the offer information quickly when people are scrolling through Facebook.

Jump to another section:

  1. Edu-tainment Content Examples
  2. Customer Stories Content Examples
  3. Offer Content Examples

What To Do With All This Content?

If you want your health and wellness business to become Omnipresent to your dream customers, you should start creating as many of these three types of content as you can, and posting them on your social media sites (Facebook and/or Instagram) consistently.

Ideally, you would create 10 to 20 pieces of this content per month, with a mix of the three types — Edu-tainment, Customer Stories, and Offer Content — and post them every one to two days.

Then, you use the data that Facebook gives you to determine which posts are most successful — which ones have the highest organic reach?

Boost the most successful posts for $1 per day, and those posts will become your $1 per day sales people for your business.

If you do this, you will become Omnipresent to your dream customers.

Your dream customers will see you everywhere, all the time.

You will be their easiest option to solve their problem, because they’ve seen you everywhere.

You’ll be their familiar friend, and they’ll want to work with you.

I’ve outlined the Omnipresence Content Marketing process more in this post.

And, if you’d like help implementing this process for your business — and writing all that content! — I’d love to talk to you.

I help health and wellness businesses consistently bring in new clients every month using Omnipresence Content Marketing.

If you would like your health or wellness business to become Omnipresent to your dream customers, let’s schedule a call today.

Schedule a Free Discovery Session With Me

How To Get Your Wellness Business In Front of 100 Of Your Dream Customers For $1 Per Day

“We’re trying to identify and reach the right clients.”

The owner of a wellness business said this to me during a call recently, but it’s not the first time I’ve heard this goal.

I’m sure this is your goal too as a health and wellness business that is trying to grow — bring in new clients on a consistent basis.

But, you’re not just trying to bring in anyone. You need to reach the RIGHT clients.

The people that are exactly right for your business.

Your dream customers.

And you can reach these customers using a simple strategy of creating data-driven content plus Facebook’s targeted reach for only $1 per day.

It’s a method I call Omnipresence Content Marketing.

Omnipresence is being everywhere, all the time; the easiest option; a familiar friend.

Omnipresence is being everywhere, all the time. Your dream customers see you wherever they go.

You become the easiest option to your dream customers.

You’re a familiar friend because your potential customers come to know you through your content that they see all the time.

You’ll be at the top of their mind the next time they’re thinking about the kind of services that you offer because they’ve seen you and the kind of helpful content you provide consistently.

You can achieve Omnipresence to the people that matter to you for just $1 per day, thanks to the Internet and Facebook advertising.

This system doesn’t mean blasting everyone. It doesn’t mean you have to do Super Bowl commercials to everyone in the whole world.

You’re just identifying the core people that matter to you and building loyalty, trust, and passion for your business.

Read on to find out how you can achieve Omnipresence for your business and start reaching up to 100 of your dream customers for only $1 per day.

How to get results:

  1. Create 10-20 pieces of content that people will enjoy
  2. Post the content to your Facebook business page
  3. Analyze the winners (expect 1 out of 10)
  4. Boost the winners for $1 per day to the right audiences
  5. Rinse & repeat until satisfied adding new content as you see fit

Now, let’s go into each of these steps in more detail.

Step 1: Create 10-20 pieces of content (per month) that people will enjoy

When I talk about content, I’m talking about information that you share on your business Facebook (or Instagram) page.

It could be blog posts, if you are blogging regularly and have valuable information to share from your blog.

But, it could also be information that is shared directly on your Facebook page.

The content that we’re creating for this method is timeless.

It shouldn’t be an event or a promotion that’s for a specific time of year (although you should definitely keep sharing that kind of information too!).

Content for Omnipresence is information that could be shared year-round, over and over again.

But, with this method you don’t have to worry about if you’re writing the right kind of content.

You’re just going to try things and see how it goes. You write it, post it, and see which ones do the best.

That’s data-driven content. You’re looking at the actual data to see which pieces of content do the best.

Then you also use Facebook’s targeted reach to create Omnipresence. With this, you can get an increase in sales, loyalty, and trust.

The key to success is the content, so let’s talk more about that first.

Edu-tainment Content

The first kind of content you should start creating is “Edu-tainment” — educational, yet also entertaining for your audience, your dream customers.

Think about the kind of content you see on Buzzfeed. But, make sure it’s something that your audience would appreciate.

Numbered lists are great.

Pictures or graphics are also great to include. And, if you haven’t already tried out Canva to make infographics, you should! (The graphics I have in this post were made with Canva.)

These posts don’t have to be very long, although this is also where you may include a link to a blog post if your blog has this kind of information as well.

Some examples of headlines that would be great for Edu-tainment Content:

  • Seven lies that keep you from getting better sleep
  • How to get big calves without doing calf raises
  • Hey, if you ever experience migraines, here’s what to do if they last more than three days
  • Seven reasons you aren’t getting rid of your belly fat
  • What no one tells you about relieving stress

A couple examples of Edu-tainment content on Facebook:

Example 1 of Edu-tainment Facebook post.
This post is both entertaining – “snaccident” (and relatable!), but also educational. She includes a link to her Fit Mom’s Snack List (which is also an email sign up link).
Example 2 of Edu-tainment Facebook post.
This one is a link to a blog post, and the actual Facebook post is very short. Note the number in the headline — numbered lists work well with this kind of content.

Customer Stories Content

What successes have your clients had because of the services you offer? Do you have some great before and after stories from your customers?

You should always be on the lookout for new customer success stories to write about and share.

Including pictures or even a video testimonial from a client would be great for this type of content too.

Humans are social creatures.

They like seeing their friends or others who are like them that have had success with your service.

And people love a good story too!

A couple examples:

Example 1 of Customer Success Facebook post.
Before and after pictures are great! This post also includes a testimonial from the client (if you clicked See More).
Example 2 of Customer Success Facebook post.
A quote from a customer, a link, and some pictures. Customer success story posts can be very simple!

This kind of content is not aggressive at all. You’re not convincing them to buy, but you’re becoming a trusted friend.

If you were sharing content that was trying to sell people all the time on your Facebook page, then it would probably become annoying, but if it’s something that people are interested in reading and hearing about, then they’ll want to see it.

You don’t need to come in hard. You don’t need to be really salesy with this kind of content.

You just need to be fun, be soft, and remember that it’s social media, so be social.

Offer Content

The last kind of content is very simple — just tell them your offer. What are you offering to new clients of your business?

This is just a pitch. People who want what you’re offering will take advantage of it.

With offer content ideas, there’s no secret. You’re just making the offer.

Maybe you’re saying your first session for new clients is free or the first month at your yoga studio is only $30.

Canva could be great for this kind of content too — create a nice little info graphic stating your offer to post.

Whatever your offer is for your business, just tell them.

Some examples:

Example 1 of Offer Success Facebook post.
2 weeks of dinners for $40. All you have to do is state the offer. They also have a video, which is nice, but not a necessity.
Example 2 of Offer Success Facebook post.
The offer in this post: Buy One, Donate One.

Your Turn:

Write down some ideas for all three types of content for your business.

Try to list 10 to 20 ideas and include a good mix of all three types of content. Include ideas for pictures, graphics, or videos you might be able to include.

Now pick one. Which one do you think would be the easiest to write first? Start writing!

(And, if you need even more examples of these three kinds of content, check out this post too.)

Step 2: Post the content to your Facebook business page

Once you have some content written, start posting it to your Facebook business page.

Just post it for now, don’t boost it, or pay for advertising at all.

At first, you are just trying to see which pieces of content perform the best with organic reach (meaning not paid).

Step 2: Post the content to your Facebook business page
Use Business Manager for your business Facebook page. Write your content and hit Publish (don’t hit Boost Post yet).

Start creating content and start posting.

In the first month that you’re starting this method, try to create about 10 to 20 pieces of content and post them every other day and start to see what happens.

You start collecting data on what is and isn’t working before you start paying even $1 per day.

Let the organic reach work first.

Quick tip: If you haven’t set up Facebook Business Manager yet, I would recommend doing that now!

Your Turn:

Post your first piece of content on your Facebook page. Try to make a graphic with Canva to add to your post, and post it!

Step 3: Analyze the winners

After you’ve been posting your 10 to 20 pieces of content in a month, next you need to analyze your organic reach.

Do this after at least a couple weeks, maybe a month, of consistently posting your pieces of content to your Facebook page every other day.

See which posts are doing the best.

To do this, go to your Facebook Business Manager and click Insights in the top bar, then click Posts in the sidebar on the left.

You’ll be able to see a list of all of your posts and the light orange bars will show you the organic reach.

Step 3: Analyze the winners
Look at the Reach column. The light orange bar shows your Organic Reach. If you have any paid posts, the dark orange bar will show the Paid Reach.

Look at them and see which ones are the highest.

If most of your posts got a reach of 40 or 50, but then one or two of them got a reach of 100 or more, those are the ones that are doing the best.

Find the ones that are at the top of the list and that have the highest organic reach — maybe one or two out of the 10 to 20 posts you’ve made.

Important note: Only about 10 percent of your original 10 to 20 posts will end up having the highest reach. So, expect one or two very best posts out of your original 10 to 20 posts.

Your Turn:

Following the instructions above, go look at the organic reach of your past posts. Start to get an idea of what the normal reach of your posts are right now, so that you’ll know how to spot a winner when you have one.

Step 4: Boost the winners for $1 per day to the right audiences

Once you’ve found the one or two winning posts that have the highest organic reach, now you’re ready to boost.

Go back to the Insights → Posts page on your Business Manager and click the blue Boost Post button on the post with the highest organic reach.

Once you do you that, the Boost Post window will open up and you’ll need to change a few settings.

  1. Change the audience to “People who like your Page and their friends.”By doing this, you’re using the power of social connection. When your post
    Choose your audience
    Choose “People who like your Page and their friends” for your audience. Select the “Edit” button on the right if you’d like to change the location of your audience to just your local area.

    shows up in someone’s feed, it’s going to show that their friend likes your page.

    People do things because they know that other people are doing it too. You’re using that power of social connection to reach the friends of people who already like your page.

    It gives you that word-of-mouth marketing without you having to actually rely on your customers sharing your information with their friends. Facebook will do it for you.

  2. If you have a local business and you’d like to limit the location of the people who are seeing your boosted post, click the Edit link to the right and select the locations you’d like to include.
  3. Uncheck the boxes for “Run promotion on Messenger” and “Run promotion on Instagram,” unless you’d also like to run this boosted post on those platforms too.
  4. Set your total budget to $14. Set your duration to 14 days.

    Set your budget and duration
    Set your budget to either $14 (or $7) and your duration to 14 days (or 7 days) in order to spend only $1 per day on your boosted post.

    This sets your budget to spend $1 per day on this boosted post for 14 days.

    You can also test it out for a shorter time by setting the budget to $7 and the duration to 7 days, but the longer you can test it out, the better your data will be.

And then, hit the big blue Boost button and you’re done!

Let it run for 7 or 14 days for $1 per day and see what happens.

After you’ve let it run for your set duration, go back to Insights and look at which ones performed the best out of the posts you’ve boosted.

Stop boosting the ones that are the lowest performing. Only keep the ones that are performing the absolute best.

For the highest performing posts, set them to boost for another 30 days, or even 60, 90, or 365 days!

Keep them running, but keep monitoring them too. See how they do, in comparison to the new posts you’re also writing and boosting.

Just keep boosting the highest performing posts for $1 per day per post.

Your Turn:

Go check out what it looks like when you hit the Boost Post button and see if you can follow along with these instructions to get all the settings right.

If you’d like to try it out, boost a post you’ve done in the past, just to see what it’s like.

Step 5: Rinse & Repeat until satisfied, adding new content as you see fit

Once you’ve got the system up and running, keep it going!

Keep writing 10 to 20 pieces of new content every month (or as many as you can).

Boost the best performing ones for 7 or 14 days, and see which ones do the best.

Keep boosting the best posts.

You’ll be stacking up really awesome posts that build upon one another.

You end up with several posts that are your absolute best performing posts and those will serve as your $1 per day sales people.

After several months of doing this process, you’ll end up with 10 to 20 best pieces of content.

This content will now serve as your 10 to 20 sales people, that only costs you $10 to $20 per day to keep going.

Each one of these $1 per day sales people could be reaching 100 potential new customers for you.

But, not just any customer.

Customers that have read your content, know who you are, and what you do to help your customers, and what your offer is.

Dream customers.

Your Turn:

Think about those dream customers. Who are you trying to attract to your business? Write down some attributes. Write down what they need to know before they can spend money at your business. Now think about what it would be like if you could reach 100 of them EVERY DAY for only $1.

Recap

  • Create your content: 10-20 pieces of timeless content per month. Adding pictures and videos makes it even better!
  • 3 types of content:
      • Edu-tainment
      • Customer Stories
      • Offers
    • Post your content organically: Use Business Manager to post your content every other day on your business Facebook page. Don’t boost yet. Just post it and watch your organic reach.
    • Measure your most successful posts: Which posts had the highest organic reach after a couple weeks, or up to a month? Find the one or two top posts out of the 10-20 you did.
    • Boost for 14 (or 7) days for $1 per day: Within Facebook Business Manager, click that big blue Boost Post button and boost the top one or two posts for $1 per day. Test them out for 7 or 14 days, whatever you (and your budget) can handle.
    • Measure your most successful boosts: Look at which of the boosted posts do the best. Find the very best of the best! Expect about 10 percent of your posts to be the best.
    • Extend to 30, 60, 90, 365-day windows: For the very best boosted posts, keep them running. Let them serve as $1 per day sales people for your business.
    • Rinse & Repeat, stacking your winning content: Keep doing it!

Benefits of Omnipresence:

  • Be seen everywhere, all the time, by your dream customers
  • Become the easiest option for people who are looking for your service
  • Become a familiar friend to your potential customers because they see your content all the time
  • Create $1 per day sales people that can reach as many as 100 people per day, that never complain, need vacations, breaks, or pay raises
  • Share great content with your existing customers too
  • Create that word-of-mouth marketing and use the power of social connection to reach the friends of your existing audience

If you would like to get the benefits of Omnipresence, but would like to do it with no effort on your part, then I’d love to help you out!

You can hire me to create and manage the entire Omnipresence Content Marketing system for your business today, and you can get all the benefits without any of the effort.

Start reaching your dream customers today.

I help health and wellness businesses consistently bring in new clients every month using Omnipresence Content Marketing.

If you would like Omnipresence for your wellness business, let’s schedule a call today.
Schedule a Free Discovery Session With Me


6 Content Marketing Experts Share Their Best Tips For Attracting New Students With A Yoga Studio Blog

Yoga, Pilates, fitness studio owners, managers, and marketing directors all ask me the same question:

Do I really need a blog?

I always answer this question with a resounding: YES! You do!

But then they want to know how they actually get results from their blog. Can you really get new clients from a blog?

You can.

And, here are six content marketing professionals who share their best tips for getting results with your yoga studio blog.

Serve First, Sell Later

Priyanka Biswas, Yogi Times

Priyanka Biswas (Source: www.yogitimes.com)
(Source: www.yogitimes.com)

“Share useful information, not just discounts and special offers,” writes Priyanka Biswas, Social Media Marketer, Founder & Owner of PB’s Digital Marketing – Strategy & Services.

Useful information is key.

Whether it’s on your blog, your email newsletter, or your social media posts, you should always be thinking about serving your audience first.

Is what you’re sharing going to improve their lives?

Serve first, sell later.

If you’re always posting or sending emails with information about your latest promotion, challenge, or new yoga pants you have in stock, people are going to categorize your content as spam.

So, reduce the selling and increase the usefulness of your content.

In her post Priyanka says:

“…people want to connect with businesses on social for very specific reasons.

For a yoga studio, in particular, they might be looking for inspirational articles related to yoga, how yoga can benefit their mind and bodies, simple explanations of the various poses etc. and not just updates and announcements about discounts and special offers.”

This is crucial.

People are connecting to your business for specific reasons.

Why do customers buy from you right now?

Why do they come in your doors?

What do you offer to them?

What knowledge do you give them in your classes already that you could give them more of outside of class, or give them a taste of before they even step in to your studio for the first time?

Figure out why your people come to you.

Write about that in your blog and more of your people, your dream customers, will start walking in your door.

Ask For Input

Stefanie Flaxman, copyblogger

Stephanie Flaxman (Source: www.copyblogger.com)
(Source: www.copyblogger.com)

If you’re still struggling with what to write about to have an effective blog, ask for input from your students.

Stefanie Flaxman, Editor-In-Chief of Rainmaker Digital, was inspired by her yoga instructor asking her students which areas of the body they’d like to focus on that day.

She writes:

“Tailoring the asanas to her students’ needs would help ensure that they were satisfied and happy that they came to her class.

But did the requests from her students stifle her own vision of what she wanted to teach? Did the suggestions block her own creativity and passion for yoga?

On the contrary, I argue that her students’ input actually enhanced her creativity and passion for yoga.

The same thing can happen when you find out what your prospects hope to achieve by consuming your content.”

As a yoga instructor or studio owner, you already know how to do this.

You talk to your students, and I’m sure there are some classes that you do this exact thing: ask for input.

You can do the same thing with your blog.

Ask your clients what they want to know more about. This can be as formal (or not) as you’d like.

Send out an email survey to all your existing clients.

Post a poll on your Facebook page.

Or, just ask the regulars the next time they come in for class.

By providing the kind of content that you know your audience wants to hear, it will be more effective and reach more people.

You’ll know you’re helping your audience, because you’re giving them exactly what they asked for!

Be Intentional

Tommi, rockpaperbrands

Tommi (Source: rockpaperbrands.com)
(Source: rockpaperbrands.com)

“Content marketing is very much suited to the principles of yoga,” writes Tommi, the Co-Founder and Web Developer at rockpaperbrands.

He then lists three of the yoga principles, as stated by the Chopra Center, and relates them to how they apply to content marketing, which includes blogging.

One of these is the Law of Intention and Desire, which states:

“Inherent in every intention and desire are the mechanics for its fulfillment. When you become quiet and introduce your intentions into the field of pure potentiality, you harness the universe’s infinite organizing power, which can manifest your desires with effortless ease.”

Tommi translates this law to content marketing as follows:

“Content marketing is not about randomly posting pictures or inspirational quotes.

For it to work, it needs to be backed by a strategy.

You must take a moment to think what your intentions are for posting this or that.
What do you wish to accomplish? Is your intention purely self-serving? What kind of value is your content adding to your audience’s life?”

Content marketing needs to be backed by a strategy, or a plan, to work well.

Do you have a strategy for your studio?

Or do you just randomly post pictures of yogis on their heads and your latest class schedule on your Facebook or Instagram page (when you happen to remember to do that)?

Here’s an example of how some simple planning and strategizing before you start writing your first blog post can help you start creating content that helps you bring in new clients:

  1. Conduct a SWOT (Strengths, Weaknesses, Opportunities, Threats) analysis on your current blog and social media content.
  2. Review and list out your best performing social posts.
  3. Review and list out your best performing blog content.
  4. What are the top problems, questions, and objections that you hear from your customers?
  5. After reviewing all the information you’ve collected, come up with three main categories for your content.
  6. Start coming up with headlines for blog posts that fit in those three categories.
  7. Pick one post that excites you the most and start writing!

You know that setting an intention for your yoga practice is crucial to your success as a yogi.

It’s no different for your blog, if you want it to be successful and actually help you to bring in new clients.

Set an intention, or a strategy, and you’ll be set up for success.

Stay Organized

Heather Hartmann, Mindful Studio Magazine

Heather Hartmann (Source: mindfulstudiomag.com)
(Source: mindfulstudiomag.com)

“In terms of competition, the fitness industry is fierce,” writes Heather Hartmann, Editor at Mindful Studio Magazine.

She asks several yoga studio owners how they stand out from the crowd with their marketing efforts.

One of those studio owners, Larry Santiago, co-owner of three studios, said, “There’s so much competition out there, not only among yoga studios, but we’re also competing against every other lifestyle and fitness brands. You have to get your message out there. Otherwise, you get lost in the clutter.”

Heather writes in her post:

“Marketing can be a useful tool when it comes to making noise in an already loud industry. To stay organized with his marketing efforts, Santiago creates a yearly content calendar that breaks down monthly promotions and establishes certain benchmarks. The calendar enables him to utilize social media and plan events in a way that flows together.”

Planning ahead and creating a content calendar are key tools to successfully marketing your studio with content.

Not having a content calendar is like if your studio didn’t have a class schedule planned out ahead of time. Wouldn’t that be chaos?

That’s what your content is like without a calendar too — chaos!

No wonder it’s not helping you bring in new customers.

Repetition Is Key

Carrie Dagenhard, Relevance Content Promotion News & Insights

Carrie Dagenhard (Source: -www.relevance.com)
(Source: -www.relevance.com)

“The other day, while rolling out my mat and preparing for some quality asana time, a thought occurred to me: Yoga really isn’t that much different from content marketing,” wrote Carrie Dagenhard, freelance content marketer specializing in health and wellness and contributor to Relevance.

She then went on to say, “OK — it’s actually a lot different. But, that doesn’t mean there aren’t several lessons businesses can gather from a little time on the mat.”

One of these lessons is: “Repetition is Key.”

Carrie writes:

“You can’t simply jump into a perfect bakasana on your first day of yoga any more than you can expect 100 new leads the first time you publish an eBook or a new blog post. The key to deepening your yoga practice — and growing your audience — is repetition.

For an aspiring yogi, this may mean stretching just a little further each day until you achieve your desired form. In content marketing, though, it means staying the course and continuing to fill your arsenal with well-written, well-researched and highly relevant content. It means regularly publishing blog posts and developing a long-term marketing plan.”

You can’t put up a new blog post every couple months and then expect it to get any traffic.

Consistency and repetition is important with content.

You need to continue to stay front of mind with your audience, and keep putting yourself out there.

To really start getting traffic from your blog posts, you should post at least weekly, and then also plan on sharing those posts everywhere you can!

Hang Out Where Your Students Are

Kelly McHugh, DOYOUYOGA

Kelly McHugh (Source: www.doyouyoga.com)
(Source: www.doyouyoga.com)

“It’s about being found in the places your students are hanging out online and delivering value outside of the yoga studio,” writes Kelly McHugh, Yoga Digital Marketing Expert, Founder of Digital Yoga Academy & Yoga Teacher, on DOYOUYOGA.

Being found in the places your students are hanging out online. That’s important.

Go to the places that your dream customers already hang out.

Sometimes that may be a local coffee or tea shop where you can hang up your flier, but you’ll probably be able to reach a whole lot more people online.

Did you know that 68 percent of U.S. adults report that they are Facebook users, and about three-quarters of those users access Facebook daily? (Source: Pew Research Center)

Your audience is hanging out online, so you should be too!

Kelly lists 10 digital marketing tips to fill your yoga classes in her post, and they are all great suggestions.

#9 is “Get Blogging” and she says:

“If the idea of this scares you, fear not! You definitely learnt something about yoga, philosophy, postures and anatomy during your yoga teacher training that you can share in words.

Blogging has so many benefits from creating content for your website packed full of relevant keywords that search engines will pick up, to driving people to your website from social media to read your posts.

You could also submit your work to other yoga websites as a way to increase your visibility and gain new traffic to your website. It’s a win-win.”

Submitting your work to other yoga websites, or guest posting, is a great way to be found online by your dream customers and to start getting more traffic to your blog.

Also, just by sharing your blog posts on your Facebook page and then boosting those posts to share with the people that like your page plus their friends, you can start to get more traffic to those posts and find new customers.

Your customers are hanging out online.

Figure out where they are, and then make sure you’re sharing your content there too.

Key Takeaways From Our 6 Experts:

  • Serve first, sell later. Share useful, valuable information on your blog, not just offers and promotions.
  • People are connecting to your business for a reason. Figure out those reasons and then share content that speaks to that.
  • Ask for input. If you don’t know what to share on your blog, talk to your customers and ask them what they’d love to know more about from you. They’ll have lots of ideas you never even thought of!
  • Be intentional. Look at your past content, your strengths and weaknesses, and plan out your strategy for your blog and the content you are going to share with your audience. Set your intention for your blog, just like you do for your yoga practice.
  • Stay organized. Planning out your blog posts, social media posts, and email newsletters on a content calendar keeps you organized and can make sure that you actually follow through with your marketing. Stay ahead of the pack by being organized.
  • Repetition is key. To have a successful blog (just like if you want to have a successful yoga practice), you have to do it over and over. Consistently, every week. One of my yoga teachers always says, “It’s a yoga PRACTICE, not yoga PERFECT.” It’s the same with a blog. Keep at it if you want it to be successful.
  • Hang out where your students are. Share your blog posts on Facebook, Facebook groups, on other yoga websites, and other places you know your students are hanging out online. You can’t just post a blog and expect people to find it. Go to them.

If this all still seems a little overwhelming or you just don’t have time to do this all yourself, it might be time to ask for help.

If you’d like some help implementing these ideas or getting more ideas for your business, I’d love to chat with you.

I help health and wellness businesses, like yoga and fitness studios, consistently bring in new clients every month using Omnipresence Content Marketing.

If you need help, let’s schedule a call.

Schedule a Free Discovery Session With Me

Enjoy this blog? Please spread the word :)